12. Running the machine#
The Machine tab drives a FluidNC controller directly from FreazyKam, over your WiFi: see where the machine is, home it, zero it, jog it, send the job to its SD card, run it, and stop it. Nothing to install on your computer — it all happens in the browser.
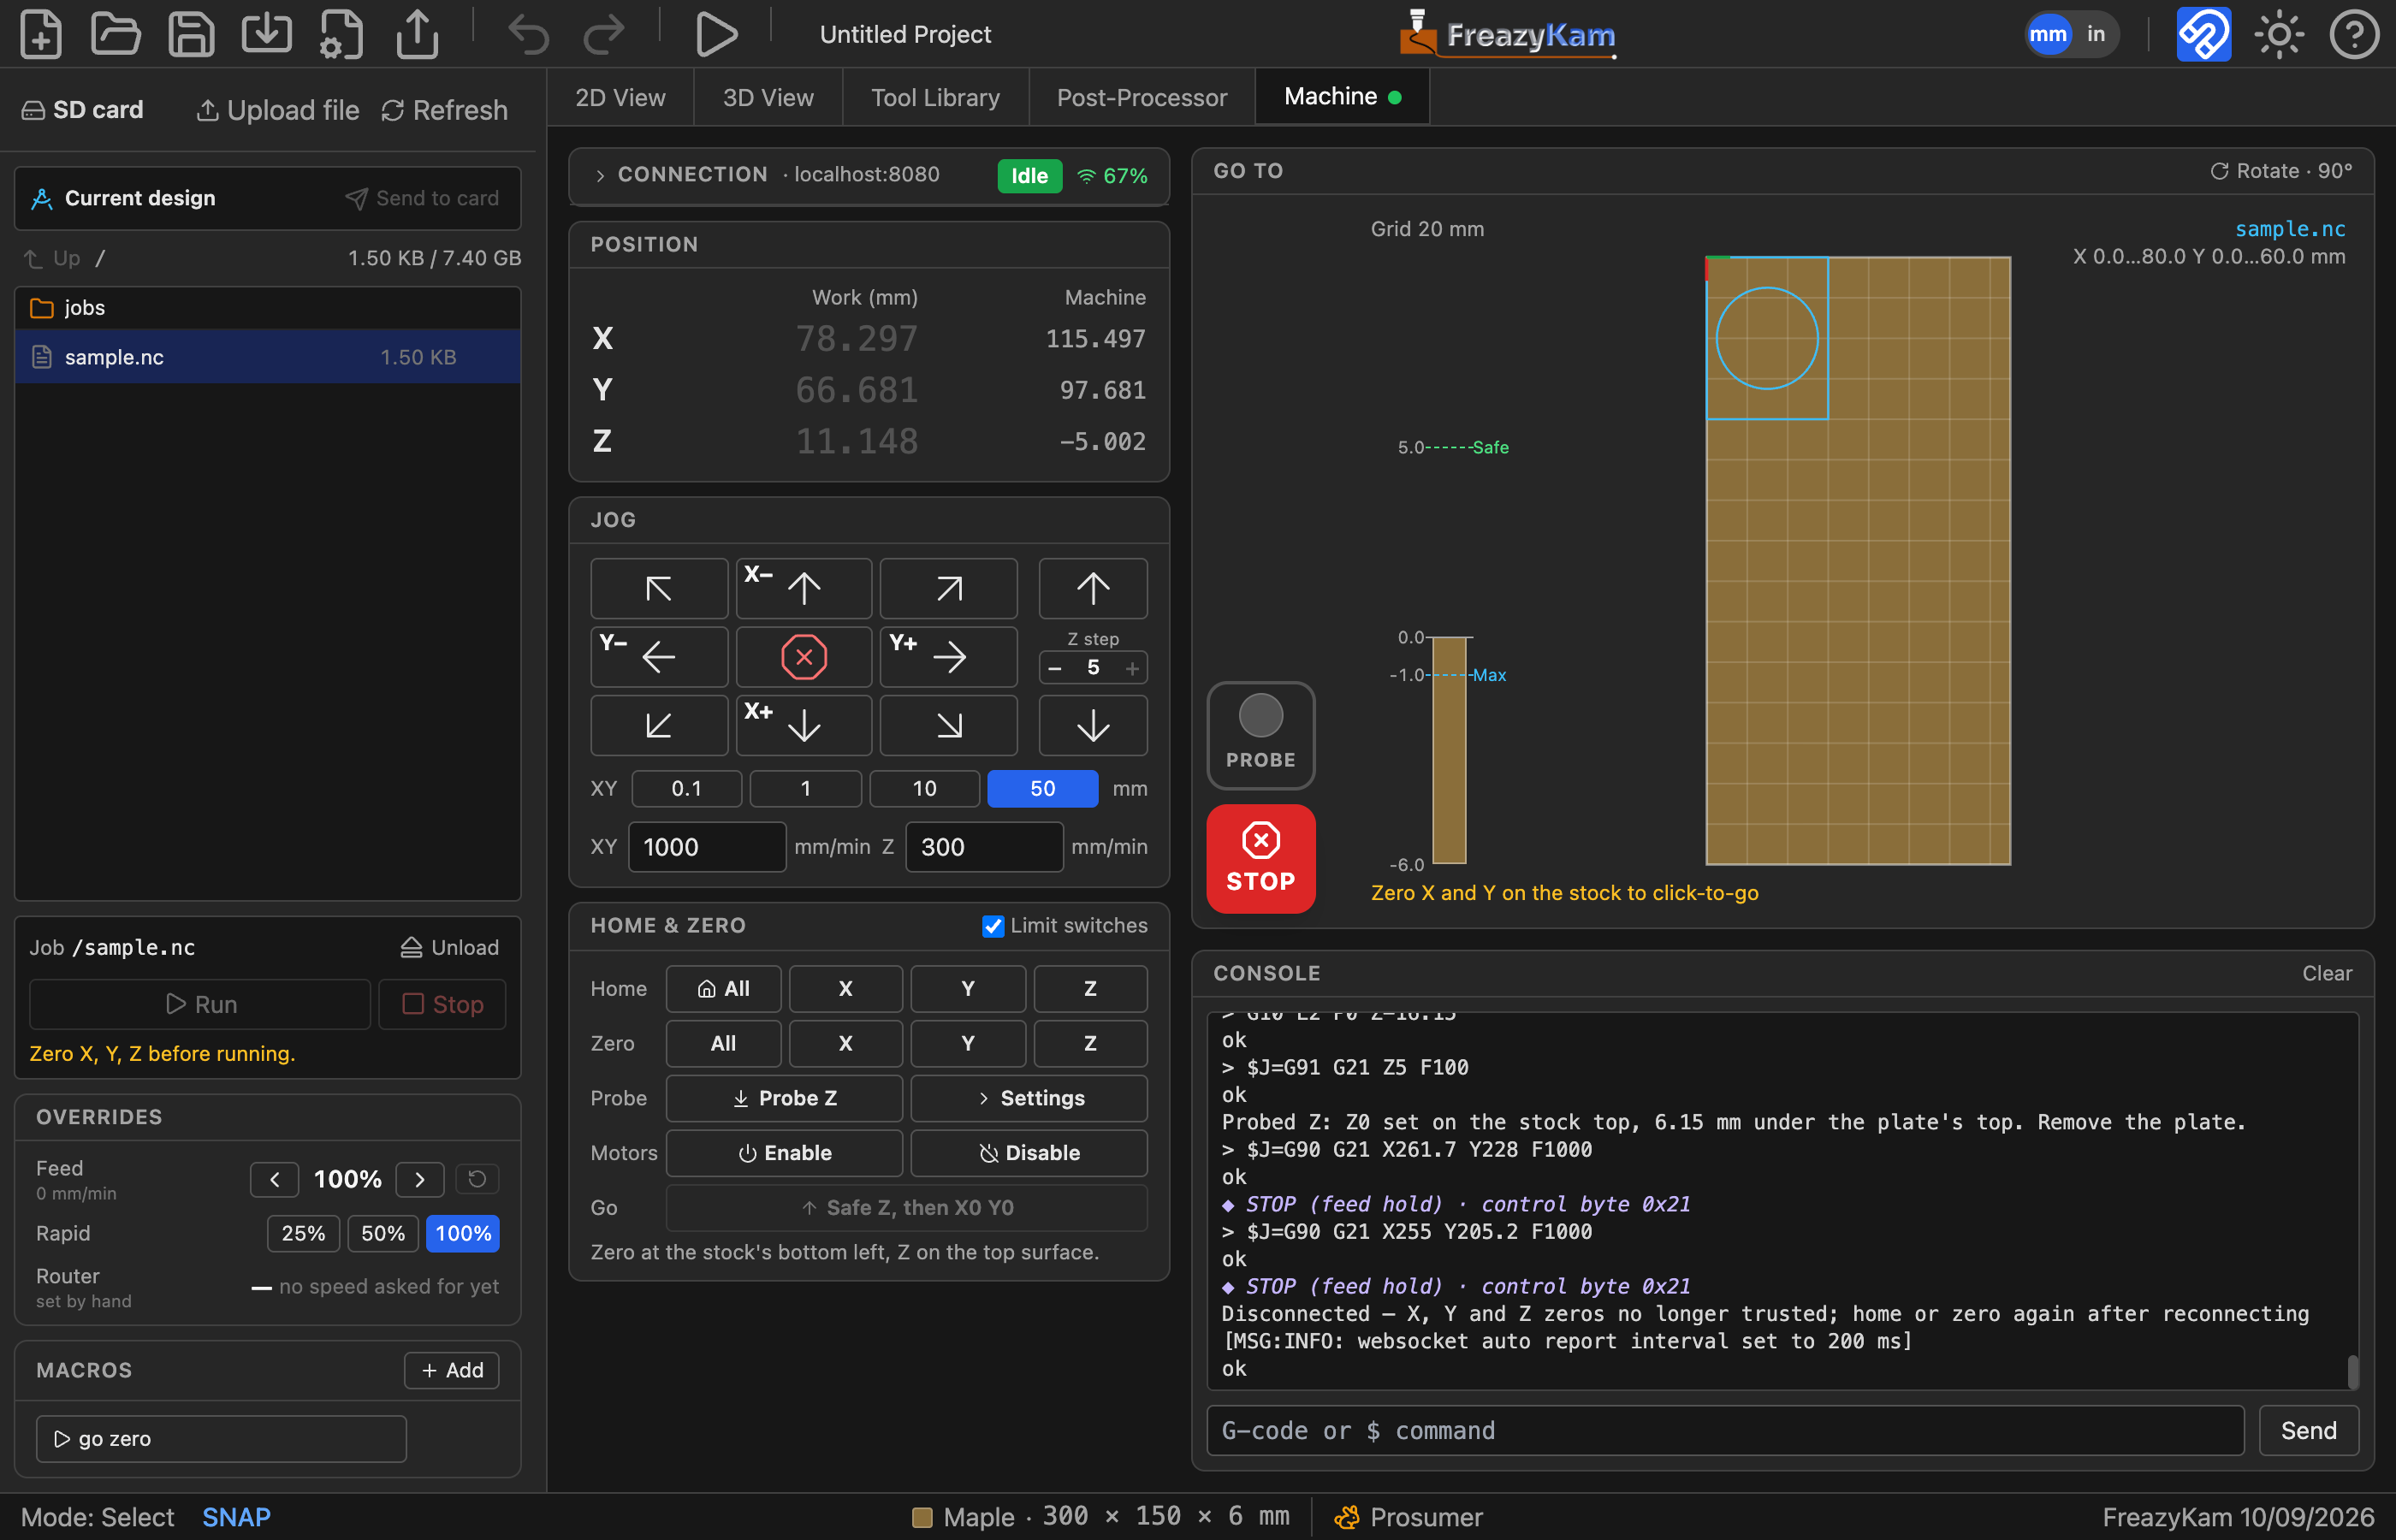
| Where | What |
|---|---|
| Sidebar | The controller's SD card, the Current design entry, the job box (Run, Pause, Cancel, Stop), and under it the feed and speed overrides and macros |
| Left column | Connection, position, jog, Home & Zero |
| Go to | The big red STOP, in its bottom-left corner, with the probe light above it, and a map of the stock — click it to send the tool there — with the Z bar beside it showing the tool's height against the stock |
| Console | Everything the controller says, and a box to type commands into |
While the Machine tab is open the sidebar shows the SD card instead of the drawing tools; switch back to 2D View to keep designing.
One-time setup: the relay file#
Before FreazyKam can talk to a controller, one small file — the relay — has to be copied onto that controller. You do this once per controller.
Why it's needed. FreazyKam is a secure (https://) website and the controller is a
plain (http://) device on your network. Browsers do not let a secure page talk to a
plain one directly. The relay is a tiny page that lives on the controller: FreazyKam
opens it in a small window and passes messages through it, and since the relay talks to
its own controller, the browser allows it.
1. Download the relay#
The file's name depends on your FluidNC version. The WebUI's About box shows it.
| FluidNC | Save the relay as | How to get it |
|---|---|---|
| v4.0 and later | freazyKam.html |
On the Machine tab, while not connected, the Connection section shows Download freazyKam.html. Click it |
| v3 | 404.htm |
Open How to install at the top right of the Connection section and use its download it as 404.htm link |
How to install also walks through these steps. Keep the name exactly as it downloads:
not freazykam.html, 404.html or relay.html.
Why the two names. FluidNC v4 shows any file on its flash as a page at
http://<your controller>/flash/<name>, so the relay can have its own name. FluidNC v3
hands any file you ask for by name to the browser as a download instead. The one
exception is its "page not found" page, 404.htm, so on v3 the relay goes in under
that name. FreazyKam opens the same address either way,
http://<your controller>/flash/freazyKam.html. On v3 that address isn't a real file,
so FluidNC answers with its not-found page, which is the relay.
2. Copy it onto the controller's flash#
- Open the controller's own web page — the FluidNC WebUI — in your browser, at
http://fluidnc.localor its IP address. - Open the Files panel and switch its drop-down from SD to Flash. It must go on the flash, not the SD card.
- Upload the relay (
freazyKam.html, or404.htmon v3) into the top folder, next toindex.html.gzand yourconfig.yaml.
Do not rename, replace or delete index.html.gz — that is the WebUI itself, and the
relay leaves it alone.
3. Check it#
Open http://fluidnc.local/flash/freazyKam.html (or
http://<IP address>/flash/freazyKam.html). A small page titled FreazyKam link means
the relay is in place. Close that tab.
| You see | Means |
|---|---|
| FreazyKam link | Done |
| The browser downloads a file | v3 with the relay under the wrong name: it must be 404.htm |
| A blank page or a not found page | The relay isn't on the flash under the name your version needs. Check you uploaded to Flash, not SD, and the name in step 1 |
Updating from an older FreazyKam? Earlier versions always installed the relay as
404.htm, and that copy keeps working. On v3 nothing changes. On v4, if
/flash/freazyKam.html isn't there, Connect tries http://<your controller>/freazykam
next. That makes every Connect about 2 seconds slower. Upload freazyKam.html
and delete the old 404.htm to skip the extra step.
Good to know#
- On v3, the controller must be on your WiFi network (FluidNC's station mode). If it is running its own WiFi network (access point mode), v3 answers every unknown address with a sign-in page, and the relay can't load.
- Connect before you start a job. While the machine is moving, FluidNC won't serve pages from its flash, so the relay can't open mid-cut. A job that is already running keeps running if FreazyKam disconnects.
- On v3, a mistyped address on the controller now shows the relay page instead of "not found". That's harmless — the relay only takes instructions from FreazyKam.
- If connecting starts failing after a FreazyKam update, the relay may have changed: download it again and replace the copy on the flash.
Connecting#
- Type the controller's address into the Connection section —
fluidnc.local, or its IP address if.localnames don't work on your network. Just the address: leave off/flash/freazyKam.html— FreazyKam adds that itself, and tries the older/freazykamif that fails. (That longer address is only for checking the relay by hand, in step 3 above.) - Press Connect. A small FreazyKam link window opens over the middle of FreazyKam: that is the relay. If the browser blocks it, allow pop-ups for FreazyKam and press Connect again.
- Leave that window open — it can sit behind FreazyKam. Closing it disconnects.
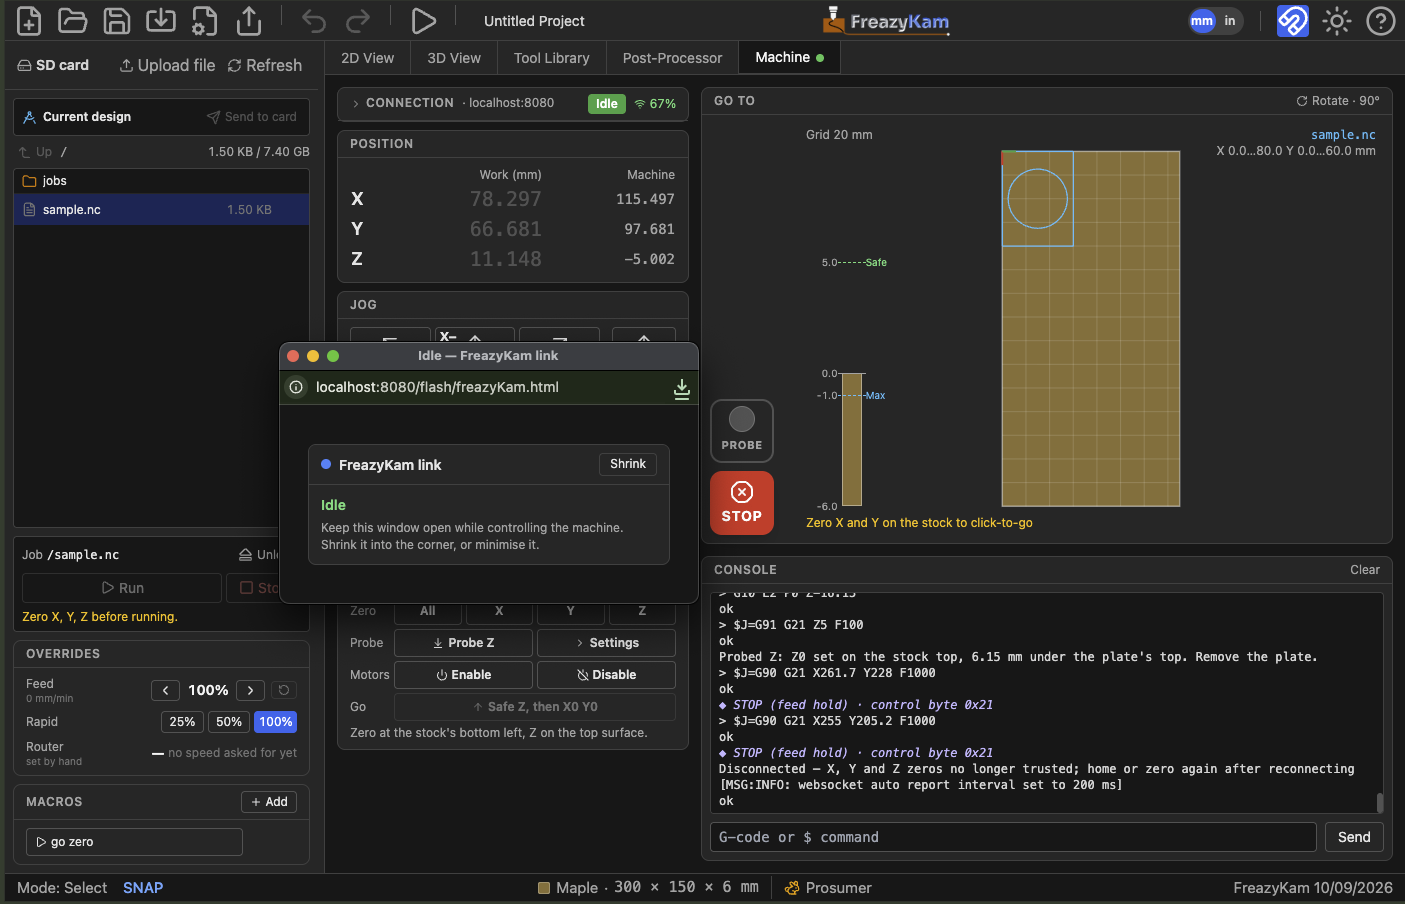
The relay window's title shows the machine state (Idle, Run…), so you can read it even when the window is shrunk into a corner.
Once connected, the Connection section shows:
- The machine state — Idle, Run, Jog, Hold, Home, Alarm. An Unlock button appears beside it in Alarm.
- The firmware the controller reports.
- The WiFi signal at the controller, as FluidNC reports it. Hover for the network, channel and signal in dBm.
| Signal | Colour | Meaning |
|---|---|---|
| 60% and up | Green | A reliable link |
| 45–59% | Amber | Usable, but the connection may drop |
| Below 45% | Red | Expect trouble |
The Machine tab shows a green dot while connected, so you can see the link is up from any other tab.
If the link drops, FreazyKam reconnects by itself — up to four tries, two seconds apart — and the console says how long the connection had been up. The loaded job and your settings survive a reconnect, and so do your zeros as long as the machine reports itself exactly where it was when the link dropped; if it moved (other than a job carrying on) or restarted, the ✓ marks clear and the console says so. See When the link misbehaves if it happens often.
Once connected, the Connection section folds down to a single line — the address, the machine state and the WiFi signal — so the jog pad and Home & Zero fit without scrolling. A second line appears only when there's something to act on: Unlock in Alarm, or a connection message. Click the header to open it for Disconnect (hovering it shows the firmware). It opens again by itself if the connection is lost.
STOP#
The big red STOP button in the bottom-left corner of the go-to map is always there while connected — where your eye already is while the machine moves, and never scrolled out of view — and stops whatever is moving:
| Moving | STOP | Result |
|---|---|---|
| A jog, a go-to click, Safe Z, then X0 Y0 | Feed hold | Slows to a stop and cancels the move. No alarm, position kept |
| A job, or G-code typed in the console | Feed hold | Slows to a stop and pauses. Then Resume, or Cancel |
| A homing cycle | Soft reset | Homing ignores a hold, so it is reset. The machine alarms |
A feed hold stops quickly but under control: at a typical 1200 mm/min cutting feed the tool travels about 1 mm while slowing, more from a fast rapid.
STOP needs the WiFi link. It is not a substitute for a way to kill the power to the machine and the router — keep one within reach. FreazyKam has no control over the router's own switch, so none of the software stops turn the router off.
Position, home and zero#
Position shows the Work position — measured from the zero you set on the stock — large, and the Machine position beside it. Units follow the toolbar's mm/in toggle.
Home & Zero#
In the left column, right under the jog pad — zeroing is jogging to the stock and pressing Zero, and it's the last thing you do before pressing Run, which waits until X, Y and Z are all zeroed.
| Row | Buttons | Does |
|---|---|---|
| Home | All · X · Y · Z | Runs FluidNC's homing cycle against your limit switches ($H, $HX…) |
| Zero | All · X · Y · Z | Makes the current position work zero on that axis |
| Probe | Probe Z · Settings | Finds the stock top with a touch plate and zeroes Z there, with any probe error right under it; Settings opens the plate thickness, search depth and feeds — see Probing Z |
| Motors | Enable · Disable | Powers the stepper motors on, or releases them so the axes move by hand |
| Go | Safe Z, then X0 Y0 | Raises Z to the safe height, then moves to the work zero |
- No limit switches? Untick Limit switches in the section header and the Home row disappears. Jog to the stock and zero there instead.
- A ✓ beside an axis means it has been zeroed on the stock, with its Zero button, on this connection. Homing alone doesn't tick anything: it fixes where the machine is, not where the stock is. So home first, then jog to the stock and zero.
- Disconnect, motor Disable and any Alarm (except a probe's own — see Probing Z) clear the ✓ marks: the machine may have been moved by hand, switched off or lost steps. To get a zero back, home that axis again. If you zeroed it after homing earlier in the session, and nothing has changed the offset since, the ✓ comes back (the console says so). Otherwise zero it again. This assumes the same bit is in the spindle; after a bit change, always re-zero Z.
- No limit switches (box unticked)? A machine that can't home would lose every zero to a disconnect, so instead: when you reconnect, if the controller reports exactly the position and offsets it had when the connection ended, the ✓ marks come back and the console says so. A restarted controller wakes at machine 0, 0, 0, which is how a restart is caught — so a disconnect with the machine at exactly 0, 0, 0 isn't restored. A reload of FreazyKam forgets them.
- The line under the buttons says where to zero: the stock's origin corner from Setup, and whether Z0 is the top surface or the bottom of the stock. Zero where it says — that is where the toolpaths are measured from.
- Disable releases the motors (and clears the ✓ marks), but any jog, go-to or job turns them straight back on — it is not a lock.
- Safe Z, then X0 Y0 needs all three axes zeroed, since the safe height is measured from Z zero.
Probing Z#
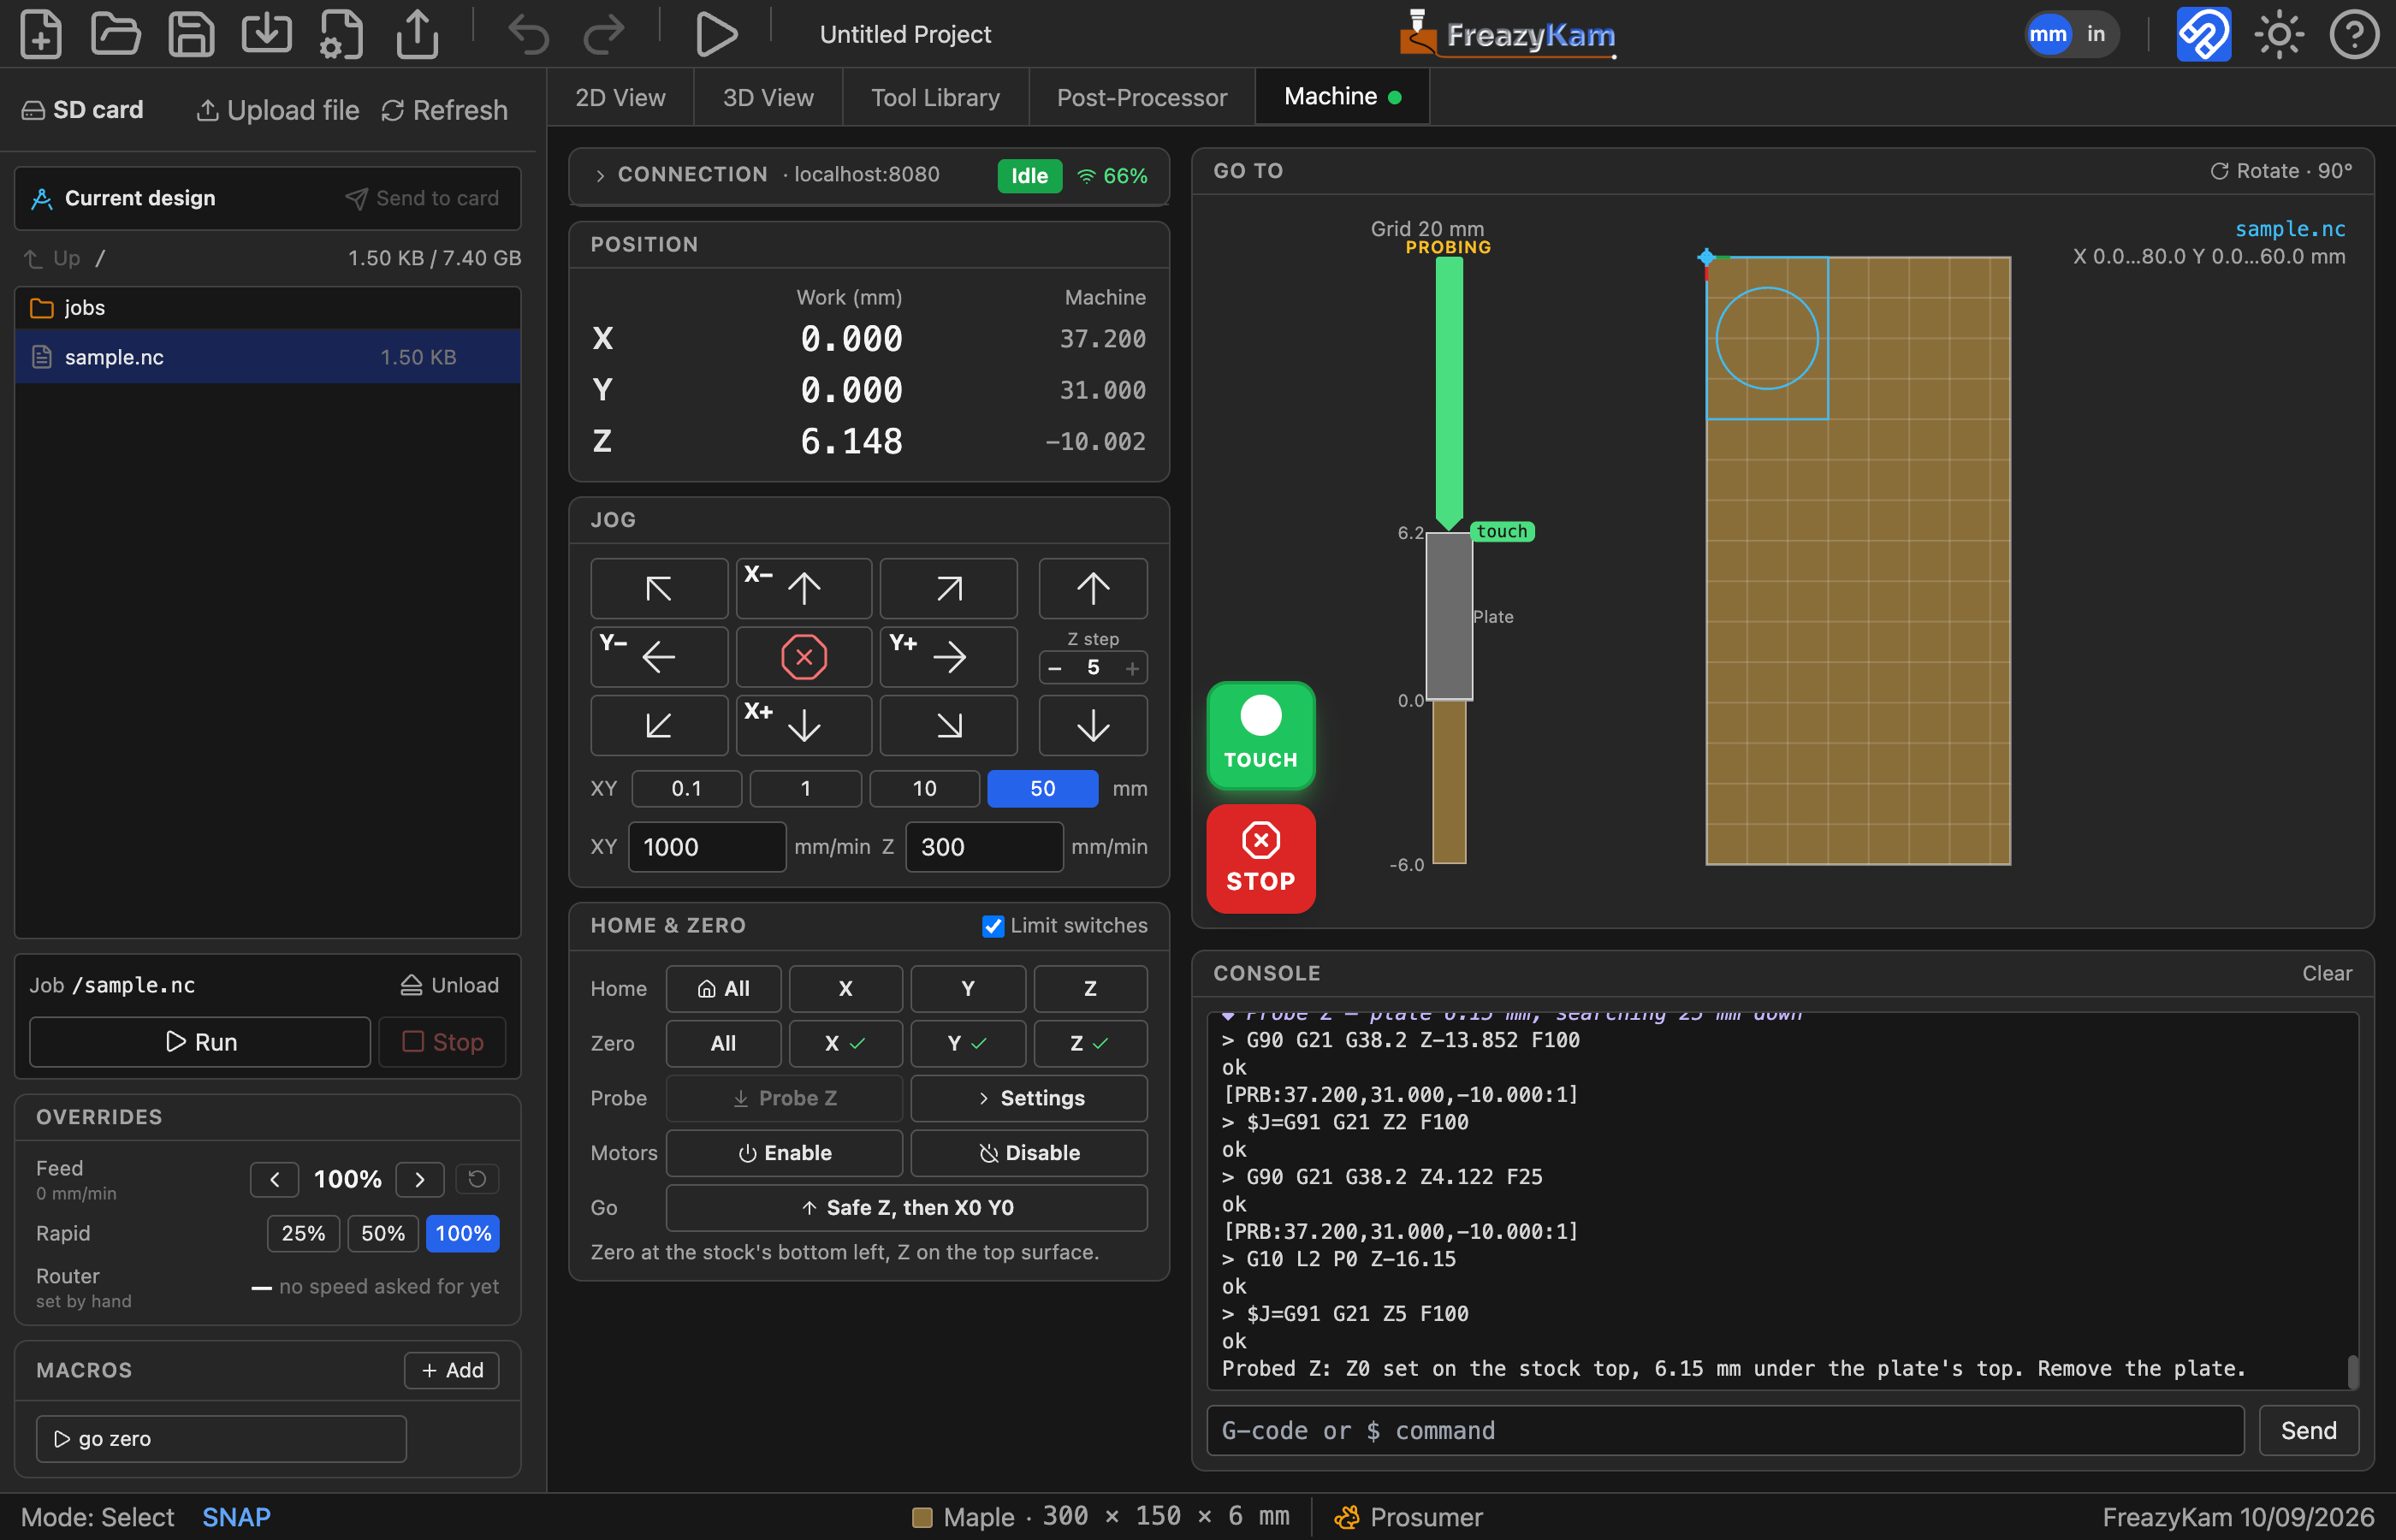
With a touch plate — a metal plate of known thickness, wired to the controller's probe input, with a clip on the bit — FreazyKam finds the stock top for you.
- Open Settings (beside Probe Z) and enter your plate's thickness as Plate. Measure it: Z0 is set exactly that far below where the bit touches.
- Check the wiring: touch the plate to the bit. The probe light — the big square above STOP on the go-to map, sized to read from the machine — should turn green and read TOUCH, and go back to grey and PROBE when you let go.
- Lay the plate under the bit on the surface Z0 is measured from: on the stock, or — with a bottom-of-stock Z origin in Setup — on the table beside the stock. Clip on, and press Probe Z.
The bit comes down at the fast feed until it touches, backs off 2 mm, and touches again slowly for accuracy. Z0 is set from that slow touch less the plate's thickness — the surface the plate lies on — the Z ✓ appears, and the bit lifts 5 mm so the plate can be taken away.
- The Z bar shows the probe while it runs: the stock, with Z0 on its top or bottom as Setup says, and the plate lying on the Z0 surface — on the stock, or on the table overlapping the stock's side view for a bottom origin. If Z is already ✓ zeroed (an earlier probe, or zeroed by hand on the stock), the tool is drawn coming down from the start. A rough zero set near the plate on the way down isn't on the stock top, so if the tool would pass the plate without touching, it goes back to searching until the touch puts it right. With no zero it isn't drawn while it searches — until the bit touches the plate nothing says how high it is — just searching. At the touch its height becomes exactly the plate's top, and from then on you see it back off, touch again slowly (green while touching), and lift clear. The usual bar comes back once it has.
- Z0 goes on whatever the plate lies on, so put it where Setup's Z origin says: on the stock for a top origin, on the table for a bottom one. The Probe Z button's tooltip reminds you which.
- Settings (beside Probe Z) opens under the row: the Plate thickness, how far down to Search (25 mm), and the Fast and Slow feeds (100 and 25 mm/min). Hovering Probe Z or Settings shows the plate thickness in use, so you can check it without opening them. If the bit doesn't touch within the search distance, the probe stops with an alarm and says so; Unlock, move the bit closer, and try again.
- It won't start while the probe already reads touching — the clip on the plate rather than the bit, or a shorted lead.
- STOP stops it at once and sets nothing.
- A probing alarm (nothing touched, or touching before it moved) doesn't clear your X and Y ✓ marks: the controller knows exactly where it stopped.
- The controller needs a probe input set up in its config file (
probe: pin:). Without one, Probe Z says so.
Jogging#
The XY pad's arrows move the tool the way they point on the go-to map. With the map unturned that's the machine seen from the front: up moves away from you (+Y), right moves +X. Turn the map to match where you sit (Rotate, on the Go to header) and the arrows turn with it. The four straight arrows are labelled with the axis they drive — Y+, X− and so on — so you can always see which. Z+ and Z− are beside it. The centre ⊗ cancels a jog in progress.
- Step — the XY row under the pad (0.1, 1, 10, 50 mm, or 0.001, 0.01, 0.1, 1 inch), and the Z step between Z+ and Z−: − and + either side of it choose 0.1, 0.5, 1 or 5 mm (0.005, 0.02, 0.05, 0.2 inch). Each is kept between sessions, so a big XY step for crossing the stock never becomes a big plunge on Z−.
- Orange outlines — once Z is zeroed, the XY arrows turn orange while the tool is below the stock surface (an XY jog there cuts), and Z− turns orange whenever its next step would end below the surface. Nothing is blocked; it's a reminder.
- Feeds — separate jog feeds for XY and Z, kept between sessions.
Jogs work before anything is zeroed — that's how you get the tool to the stock to zero it.
The go-to map#
The Go to map shows the stock as set up in Setup, in its material's colour, the tool's position (a blue crosshair, once X and Y are zeroed), work zero (red and green axis lines), and the loaded job — the file from the SD card that Run will cut — with its name and extent in the corner, and a Runs off the stock warning if it goes past the stock's edges. Only its cutting moves are drawn; rapids are left out.
The map shows the loaded job and nothing else. The design open in FreazyKam isn't drawn: it can't run until it's on the card and loaded, which Send to card does in one step. With no job loaded — after Unload, say — the stock is bare.
Turning the map to where you sit#
Unturned, the map is the machine seen from the front: +X to the right, +Y up the screen (away from you). If you sit somewhere else — beside the machine, say, with the laptop at 90° to the table — the map no longer lines up with what you see, and it's easy to misread. A job cutting around a shape can look as if the marker is a side or more ahead of the bit, when the two are in step and the picture is simply turned a quarter-turn from your view.
Rotate (on the Go to header) turns the map a quarter-turn clockwise per press; the header shows the current angle, e.g. Rotate · 90°. Pick the angle for where you sit:
| You sit… | Rotate | On screen: up is | right is |
|---|---|---|---|
| In front of the machine | 0° | +Y (away from you) | +X |
| At its right-hand end (the +X end), facing it | 90° | −X | +Y |
| Behind it | 180° | −Y | −X |
| At its left-hand end (the −X end), facing it | 270° | +X | −Y |
A quick check: jog X+ a few millimetres with the router off. The marker should move across the screen the same way the bit moves as you see it. If it doesn't, press Rotate again.
At 90°, for example — sitting at the machine's right-hand end — the map's top is the far end of the table (−X), the stock's X axis runs down the screen, and work zero's red X arrow points down. Everything follows the turn:
- The jog arrows move the tool the way they point on the map, so the up arrow now jogs X− (away from you) and the right arrow jogs Y+. The four straight arrows are labelled with the axis they drive, so you can always see which.
- Clicking the map still sends the tool to the spot you clicked.
- The Z bar is unchanged — up is still up.
Only the view turns: positions, the G-code and the machine are untouched. The angle is kept between sessions, and travels with the Machine tab's settings in a settings file.
Click anywhere on the map to send the tool there. This needs X and Y zeroed and the machine Idle; until then the map says what it's waiting for. If Z has been zeroed and the tool is below the safe height, Z rises first, so the bit isn't dragged across the stock. A blue circle marks where you clicked, with a dashed line from the tool, until the move finishes. STOP or the jog pad's ⊗ cancels it.
The Z bar#
The bar to the left of the map is the same stock seen from the side, lined up with the map: its bottom is level with the stock's bottom edge, and its top stands for twice the safe height. On it:
- the stock, in its material colour, from its bottom to its top surface;
- Safe (dashed green) — the safe height: the job's own, from its rapids, when a file from the card is picked, otherwise the one in Setup;
- Max (dashed blue) — the deepest the toolpaths cut;
- the tool, blue, its tip at the current Z, with the Z value beside it.
The tool appears once Z is zeroed — before that there is no telling where it is against the stock. Raised higher than the top of the bar (after homing, say), it stops at the top with an arrow, and the number still gives the real height.
The SD card#
The sidebar lists the files on the controller's SD card. Click a folder to open it, and
Up to go back up — or click any folder in the path above the list (/ jobs / signs)
to jump straight to it.
| Current design | Names the design open in FreazyKam. It isn't on the map until it's sent and loaded |
| Send to card | Writes the design's G-code to the card as <project name>.nc and loads it, ready to run. Replaces a file of the same name |
| Upload file (header) | Copies G-code files from your computer to the folder shown, and loads the last one as the job, ready to run. Replaces a file of the same name |
| Drop files on the list | The same as Upload file: drag G-code files from your computer onto the file list |
| Refresh (header) | Re-reads the card |
| Click a file | Loads it: reads it off the card and shows its toolpath on the map |
| Bin (on hover) | Deletes a file — click once to arm, again to confirm |
| Unload (on the Job line) | Clears the loaded job, leaving the map clear. The file stays on the card |
- Loading only reads the file. Nothing happens on the machine until you press Run — that goes for a file loaded by uploading it, too.
- Uploading and deleting are switched off while a job is running, so the card isn't busy with two things at once.
- If a file has a line longer than 80 characters, loading it shows a warning. Recent FluidNC stops a job at a line over 127 characters with "Line too long". Files FreazyKam writes never have such lines; files from elsewhere might.
Running a job#
The job box in the sidebar, under the file list, names the loaded file.
Run starts it from the SD card. It is enabled only when:
- X, Y and Z are all zeroed — the job's coordinates mean nothing until they are.
- A job is loaded — and it is exactly what the map shows, so what you see is what you cut.
- The card is not busy loading or uploading — otherwise Run could start the file you were moving away from.
While it runs, a progress bar shows how far through the file the controller has read. (It reads a few moves ahead of the cut, so the bar leads the tool slightly.)
| Button | Does |
|---|---|
| Pause | Feed hold — slows to a stop and holds. The spindle keeps turning |
| Resume | Carries on from where it paused |
| Cancel job | Appears once a pause has fully stopped. Ends the job without an alarm — position and zero kept — and raises Z to the safe height |
| Stop (■) | Stops at once with a soft reset. The machine alarms, because it was moving |
To end a job early, Pause then Cancel. Stopping… shows while the machine slows down; Cancel unlocks when it has come to rest. Stopping a moving machine with a reset can lose position — the gantry's momentum makes the motors skip — which is why FluidNC alarms and you would need to re-zero.
After a Stop or any alarm, press Unlock beside the state, then check the machine before carrying on.
Overrides#
In the sidebar, right under the job box: change the feed and speed of a running job without stopping it.
| Feed | ‹ and › step 10 % at a time (to the next multiple of 10), and ↺ goes back to 100 %. Under the label: the actual feed, and while overridden what the program asked for first — 1200 → 960 mm/min |
| Rapid | 25, 50 or 100 % |
| Spindle | As Feed, for a VFD spindle the controller drives |
| Router | A router set by its own dial (DeWalt, Makita, or a manual spindle — the spindle type in Setup) ignores the controller's speed, so instead of an override this shows what to set the dial to for the speed the program asks for: Dial 2.5 (19,800 rpm) |
The percentages shown are what the controller reports, so its limits (10–200 %) read true. Anything other than 100 % shows in blue.
The console#
Everything the controller says, plus the commands FreazyKam sends (lines starting > —
you could type any of those into the box yourself). Lines starting ◆, in italics, are
button actions — STOP, jog cancel, reset, overrides — which go to the controller as
single control bytes rather than text; the byte is shown at the end, but there's nothing
there to type.
Type G-code or a $ command into the box at the bottom and press Enter. ↑ and ↓
bring back commands you typed before, newest first, as in a terminal — the last 50 are
kept between sessions. Clear empties the console.
Useful commands:
| Command | Does |
|---|---|
$X |
Clears an alarm (same as Unlock) |
$C |
Check mode: runs a job without moving, to prove the file works. $C again to leave |
[ESP420] |
The controller's status, including its WiFi signal |
[ESP410] |
The WiFi networks the controller can hear |
Macros#
Below the overrides, Macros keeps G-code you send often under a name — a park position, a probe routine, a spindle warm-up — so it's one click away.
- Add opens a name and a box for the G-code, one command per line. Blank lines and
lines that are only a comment (
; …or( … )) are skipped. - Click a macro to send it. Its lines go out one after another, and the button reads sending… until the last has gone. Hover it to see exactly what it sends.
- STOP, feed hold, reset or a lost connection end a macro where it is: the lines after that are never sent.
- A macro can't run while a job is running, or while another macro is still sending.
- Hover a macro for Edit (pencil) and Delete (bin — click once to arm, again to confirm).
- Macros are kept with the machine's settings, and travel in a settings file's Machine tab section.
When the link misbehaves#
| Symptom | Likely cause | What to do |
|---|---|---|
| No answer from the relay on Connect | The controller is off, at a different address, or the relay isn't installed | Check the address; open http://<controller>/flash/freazyKam.html — see Check it |
| The relay window downloads a file | v3, with the relay saved under the wrong name | Re-upload it as 404.htm |
| Connect takes a couple of seconds longer than it used to | v4 holding only an older 404.htm relay |
Upload freazyKam.html (see step 1) |
| Connect works, then drops every few minutes | A weak or crowded WiFi link | Check the signal in the Connection section |
| Signal amber or red | The controller is too far from the router, or its antenna is boxed in | Move the antenna clear of metal; use a nearby WiFi extender |
| Connected to the wrong network | It joined the router instead of a closer extender | Give the extender its own network name, then point the controller at it (below) |
| Line too long stops a job | A line over 127 characters | Regenerate the file from FreazyKam, or shorten the line |
Choosing which network the controller joins. If your extender broadcasts the same name as your router, the controller may join the farther one. Give the extender's 2.4 GHz network its own name (the controller only uses 2.4 GHz), then in the console:
$Sta/SSID=Your_Extender_Name
$Bye
$Bye restarts the controller onto the new network. Add $Sta/Password=… before it if
the extender's password is different. If the name or password is wrong, the controller
starts its own WiFi network (usually called FluidNC) instead — join that from your phone
and fix the settings in its WebUI.
On a busy 2.4 GHz channel, changing your router's 2.4 GHz channel to 1 or 11 can make a large difference — the extender follows the router's channel by itself. Pick a fixed channel rather than Auto, so the router doesn't switch mid-job.
Next#
- 11. When something goes wrong — problems with the design and its toolpaths
- Back to the guide