10. Simulating and exporting#
Everything up to here has been about making toolpaths. This chapter is about the last stretch: checking they do what you meant, translating them into your controller's dialect, and getting the file onto the machine.
The simulator#
Press Simulate G-code in the toolbar. The program is built from every visible operation, in Ops-strip order, and loaded into the player.
It opens on the finished part, not on bare stock. That's deliberate — the question you opened the simulator to answer is usually what does this come out like, and showing you the answer immediately beats making you watch four minutes of cutting first. Press Play and it winds back to bare stock and animates from there.
| Control | Does |
|---|---|
| Play / Pause | Or the spacebar |
| Reset | Back to the start |
| Seek | Scrub anywhere in the program |
| 1× 5× 20× 100× | Playback speed |
| Document icon | Opens the G-code viewer, which follows along line by line |
| × | Closes the simulator |
The readouts#
Two bars sit under the stock, and they are the reason to run a simulation rather than just look at the toolpath.
Position and progress — the current line number, the tool's Z, the feed
(or rapid), and elapsed against total cycle time. That total is worth reading before you
commit an evening to a job.
Spindle and chip load — the RPM with its router dial equivalent, and the chip load as
actual / target with a verdict: 🔴 rubbing · too hot, 🟢 sweet spot, 🔵 chips too
large. See chapter 3 for the bands. On manual
feeds it also suggests the feed that would bring you back into the band.
2D and 3D#
2D View plays the program flat, with a trail behind the tool. It's the quicker read for travel moves, ordering and retracts.
3D View removes real material from a solid block. This is the one that tells you what the part will look like — scallops, flat spots, an over-deep pocket. The toggles top-right turn Axes, Toolpaths, Stock, Tool, Shapes and Follow Tool on and off.
It keeps itself up to date#
Leave the simulator open, change an operation, and it rebuilds and reloads by itself
once the operations settle. You don't have to press Simulate again. An imported .gcode
file is the exception — that program is not something the app generated, so it is left
alone.
What a simulation proves and what it doesn't. It proves the toolpaths do what you meant — the right shapes, the right depths, in the right order. It knows nothing about whether your machine is trammed, your stock is where you think it is, your workholding will hold, or your bit is sharp. The export review says this too, and it is right to.
The post-processor#
Controllers disagree about the details of G-code. A post-processor profile is the set of rules for turning toolpaths into the dialect yours speaks.
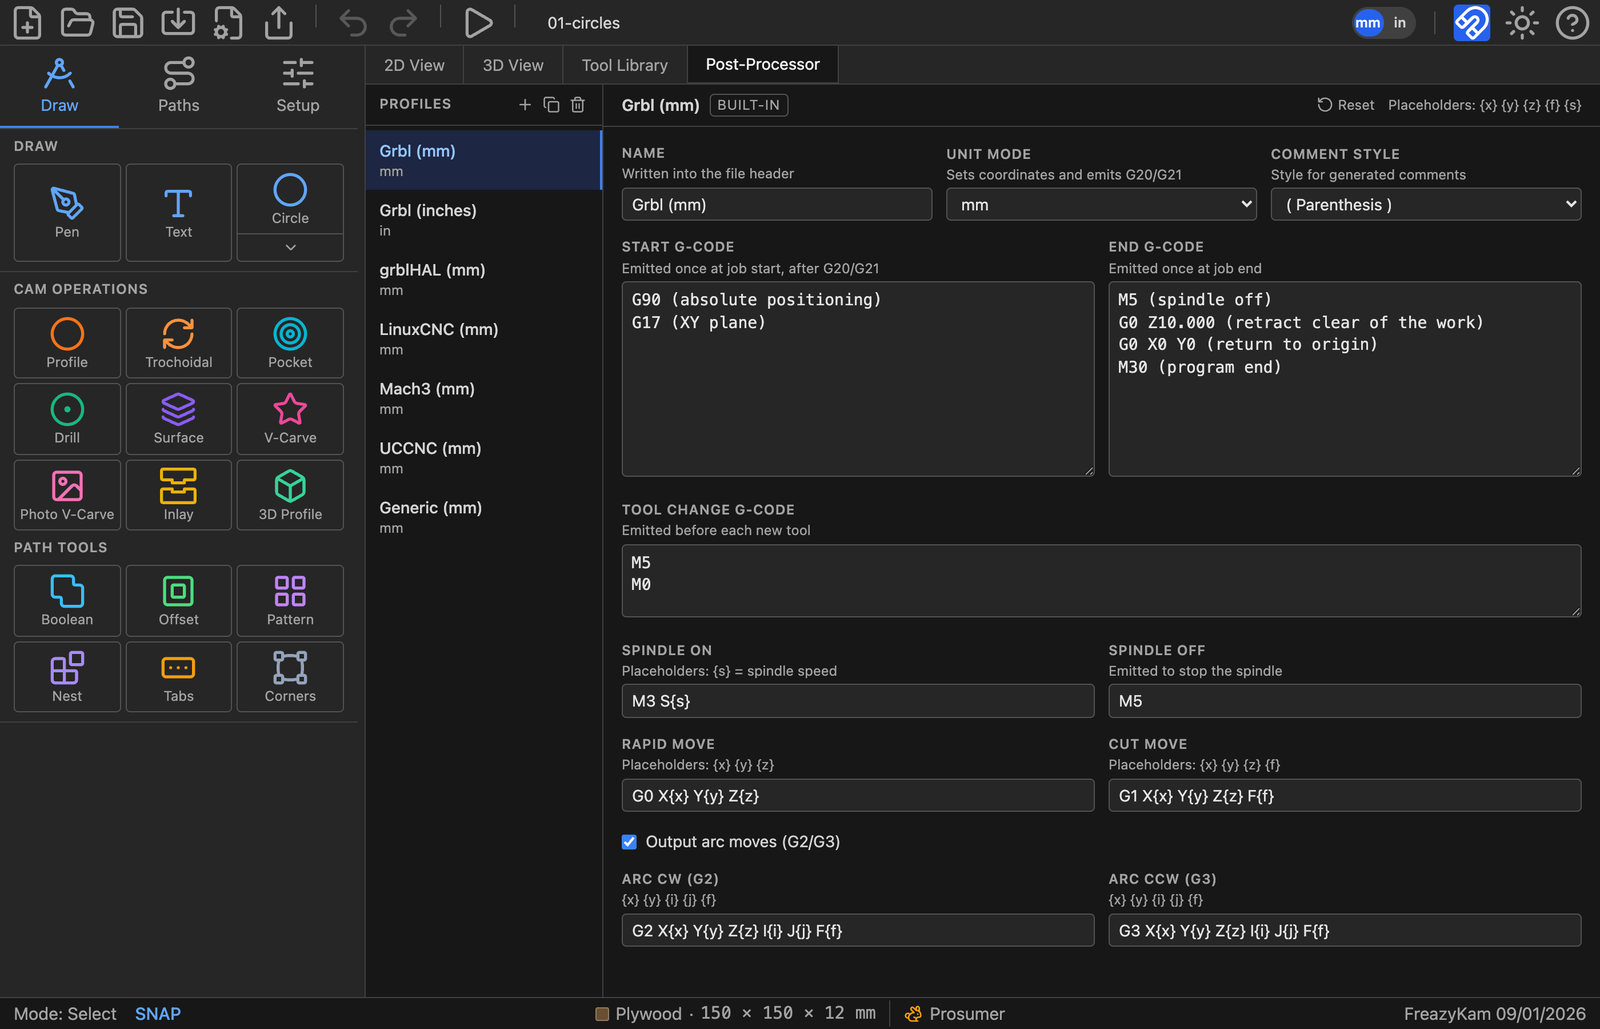
Seven profiles are built in — Grbl (mm), Grbl (inches), grblHAL, LinuxCNC, Mach3, UCCNC and a Generic one. Grbl (mm) is the default and covers most hobby machines.
Any of them can be edited, and a built-in carries a Reset button that puts it back to factory defaults, so you can experiment without losing the original. To keep both, duplicate a profile and edit the copy.
What's in a profile#
| Setting | Emitted |
|---|---|
| Name | Into the file header |
| Unit mode | Sets the coordinates and emits G20/G21 |
| Comment style | ; semicolon, ( parenthesis ) or none |
| Start G-code | Once at job start, after G20/G21 |
| End G-code | Once at job end |
| Tool change G-code | Before each new tool |
| Spindle on / off | {s} is the speed |
| Rapid / Cut move | {x} {y} {z} {f} |
| Arc CW / CCW | {i} {j} centre offsets — and a switch to turn arcs off entirely |
Unit mode is the only thing that decides whether the file is in inches or millimetres. The toolbar's mm/in toggle is a display setting and has no effect on the exported file.
Turn off Output arc moves if your controller's arc handling is unreliable — everything comes out as short straight moves instead. Bigger file, no arcs to misinterpret.
The tool change block is worth setting up properly. The default M5 / M0 stops the
spindle and pauses so you can change the bit and re-zero. If your controller handles tool
changes differently, this is where to say so.
The export review#
Export G-code runs a preflight check first and shows you a G-code review before writing anything.
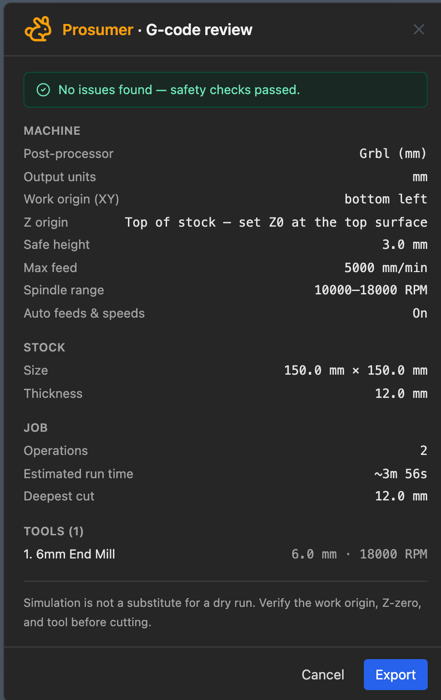
The summary#
Read the top block against reality, because this is the last point at which a mistake is free:
- Post-processor and output units — is this the file your controller wants?
- Work origin (XY) and Z origin — do these match how you actually zeroed the machine? The Z line spells it out: "Top of stock — set Z0 at the top surface."
- Safe height, max feed, spindle range — your machine's limits as the app understands them.
- Operations, estimated run time, deepest cut — is the deepest cut deeper than your stock, and is the run time what you expected?
- Tools — every cutter the program calls for, with its speed.
The warnings#
Warnings don't block the export; the button just changes to Export anyway. Read them anyway. They cover:
- Operations that failed, or that are stale because their geometry changed after the toolpath was generated
- Toolpath that runs outside the stock, or past your machine's table travel or Z travel
- Tool changes and spindle commands your controller may not act on
- Chip load outside a safe band, and spindles that can't run slow enough for the material's surface speed
- For inlays, a male plug that doesn't match its female socket
Splitting by tool#
If the job uses more than one tool, a Split into one file per tool option appears, along with a File prefix box. The button becomes Export N files.
This is usually the right choice. One file per cutter means you load a bit, run its file, and stop cleanly — rather than trusting your controller to do something sensible at a tool change. A single-tool job doesn't offer either option.
Getting it to the machine#
The .gcode file lands in your downloads. Copy it to your controller however you normally
do.
Before you press cycle start, the things the app told you but cannot check:
- Zero X, Y and Z where the review said they were.
- Check the first move. Bring the tool to Z-safe and step through the opening lines in your sender before letting it plunge.
- Confirm the bit matches the one the review named.
Then cut it.
Next#
- 11. When something goes wrong — failures, refusals, and what they mean