5. Cutting with an end mill#
Five operations cut with a flat or ball-nosed cutter: Profile follows a line, Pocket clears an area, Trochoidal cuts a slot at low load, Drill makes holes, and Surface flattens the stock. Between them they cover most of what a router actually does.
Profile#
A profile follows a path. The only question that really matters is which side of the line the tool runs on, because that is what decides whether your part comes out the size you drew it.
| Cut side | Tool runs | Use for |
|---|---|---|
| Outside | Outside the line, offset by its radius | The outline of a part — the line is the finished edge |
| Inside | Inside the line, offset by its radius | A hole or window — the line is the finished wall |
| Centerline | Axis straight down the line | A groove or a score — takes half a tool width off each side |
Getting this wrong is the classic beginner's mistake: a part cut centerline instead of outside comes out one tool radius undersized all round, and the error is invisible on the canvas.
Other fields:
- Stock allowance leaves material on the wall for a finishing pass. Negative cuts past the line, which is how you get a slip fit rather than a press fit.
- Ramp in enters each pass on a slope instead of plunging. Leave it on unless you have a reason.
- Direction — climb for a clean edge on a rigid enough machine, conventional if the machine has backlash it can't take up.
The tool's radius changes with depth. With a V-bit or a taper the wall is not vertical, so the offset is taken at the cut surface — the finished wall touches your line at the start height and tapers below it. With an end mill this is a distinction without a difference; with a taper it is the whole story.
Open paths#
A profile of an open stroke is cut centerline — that is the only reading that means anything, since a line with no inside has no side to offset to. Ask for inside or outside on an open path and the operation refuses and says so, naming the side you chose.
This refusal matters more than it sounds. Without it, an open U-shaped path handed to an area operation gets silently treated as closed — joined mouth to mouth — and the machine cuts a shape you never drew, with a toolpath that looks perfectly reasonable on screen.
Holding tabs#
Tabs are small bridges of uncut material that stop a part coming loose on the final pass and being thrown by the cutter.
Tabs is a Path Tool, not an operation. It attaches to the path, gets its own chip in the Objects strip, and any profile cut on that path honours it.
| Field | Meaning |
|---|---|
| Count | How many, spaced evenly around the path |
| Length | How far along the path each one runs |
| Height | How much material is left under the cutter |
Drag any tab along the path to move it. Put them on straight runs rather than corners, away from anything delicate, and where you don't mind cleaning up — the tab has to be cut or sanded off afterwards.
Height is a trade: enough to hold the part through the last pass, little enough to part with a chisel. Two to three millimetres suits most wood.
Pocket#
A pocket clears the area inside a closed boundary. Anything closed that sits inside the boundary is read as an island and left standing — you don't declare islands, the app reads them off the geometry.
Invert Pocket#
Nested outlines have two valid readings, and only you know which is the part. A ring drawn as two circles is either clear the annulus and leave the middle, or clear the middle and leave the ring. When the selection nests, an Invert Pocket checkbox appears to say which.
The operation stores the reading it used, so reopening the form shows what that pocket actually did rather than guessing again.
The five strategies#
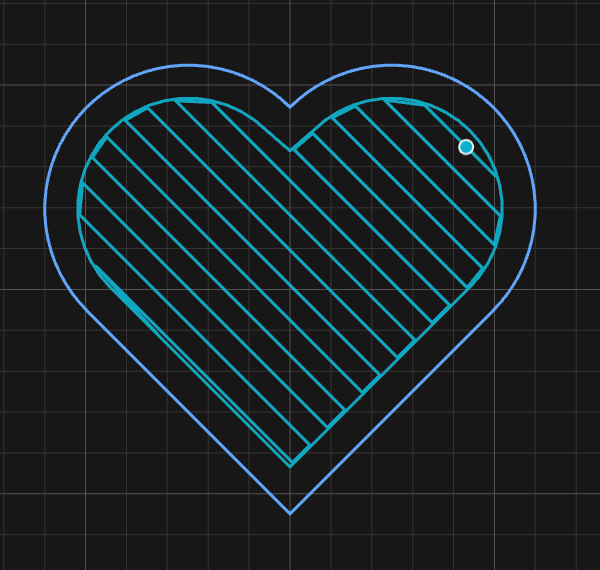
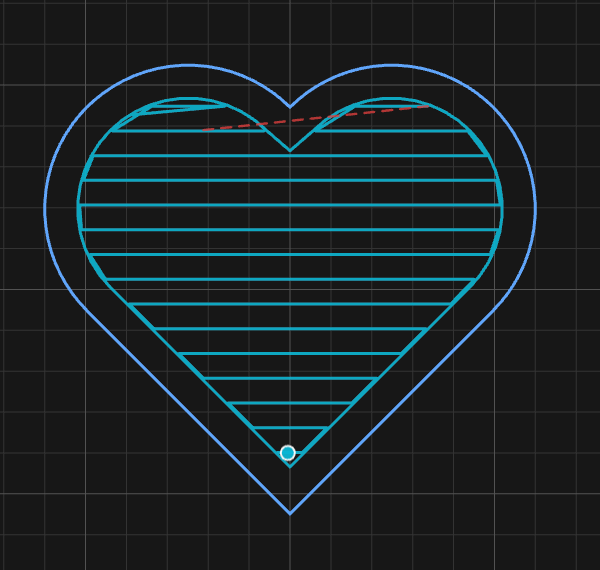
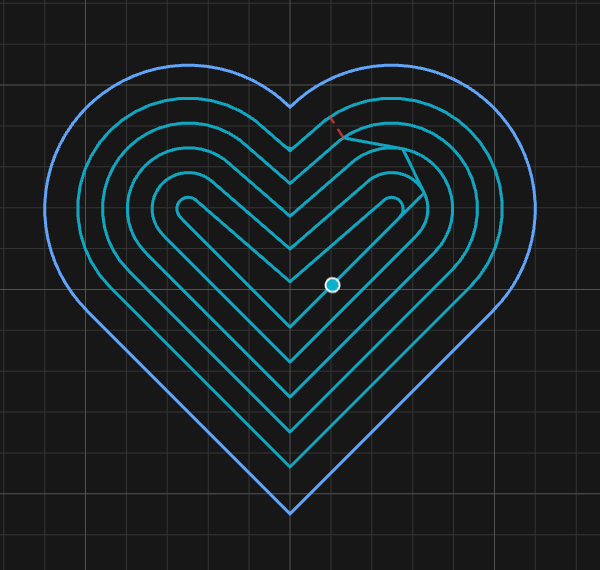
The same heart pocket, cut five ways with the same tool and stepover:
| Auto | Raster | Contour | Morph | Adaptive |
|---|---|---|---|---|
 |
 |
 |
 |
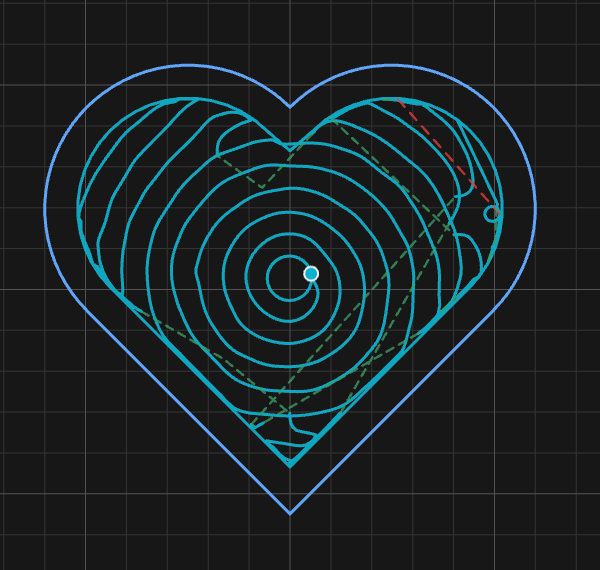 |
| Rastered, plus a contour round the wall | One angle, straight across | Nested rings | One unbroken spiral | Constant engagement |
Look at what each one does to the corner of the heart — that notch is where they differ most, and it is the part of a pocket that decides whether you get a clean floor.
| Strategy | How it clears | Best for |
|---|---|---|
| Auto | Picks per area — rasters open ground, contours around islands, adaptive on the junctions | Start here. Mixed pockets, anything with islands |
| Raster | Straight parallel passes at one angle | Simple open pockets with nothing in the way |
| Contour | Concentric offsets following the boundary inward | Walls and islands that must be traced |
| Morph | One continuous spiral morphed between the boundary and the interior | Smooth organic shapes, fewest retracts |
| Adaptive | Holds a constant tool engagement | Hard material and deep pockets — heavier depth of cut at lower load |
Contour and Morph look alike and are not. Contour cuts a stack of separate closed rings, lifting between them. Morph is one continuous path that spirals from the wall to the middle without lifting at all — which is why it has the fewest retracts and why it can't always be done.
Auto is the default and usually the right answer. The others are there for when you know something about the shape that the general case doesn't.
A strategy can decline a shape. Morph in particular only suits some geometry. When it declines, Auto generates the pocket instead and the form tells you so — "morph declined this shape, so auto generated it instead." You can Alt-click Generate to force it, and if it declines even then, the message says so rather than sending you round the loop again.
Stepover, engagement, and angle#
Stepover is how far each pass moves over, as a percentage of tool diameter. On the Adaptive strategy the same slider becomes Engagement, because that strategy holds engagement constant rather than spacing.
Angle applies to raster passes. Left on Auto (longest passes per area) the app picks the direction that gives the fewest, longest passes — fewer turns, less air. Untick it to pin an angle, which is what you want when the grain, or a wall you care about, says so.
Rest clearing#
Every pocket gets a rest-clearing pass. Whatever a strategy's passes couldn't reach is cut after them and before the wall pass, so it comes off as a light skim rather than being hit at full width on the wall pass. You don't configure it; it's there because every strategy leaves something somewhere.
Trochoidal#
Trochoidal cutting takes a slot at low load by moving the cutter in overlapping loops along the path instead of ploughing straight down it. The full width still gets cut, but the tool is only ever engaged over a small arc. Use it in hard material, on a light machine, or wherever a full-width slot would be too much.
| Field | Meaning |
|---|---|
| Cut side | Inside, outside, or centerline |
| Loop amplitude | How far the loops swing either side |
| Step / loop | How far along the path each loop advances |
| Finishing pass | A clean-up pass after the loops |
Centerline trochoidal is the one to understand. It follows an open stroke — the only operation that genuinely does — and the slot is centred on the line you drew. The loops swing half the amplitude each way, so the finished slot comes out:
slot width = 2 × loop amplitude + tool diameter
Draw a line, ask for a 2 mm amplitude with a 6 mm cutter, and you get a 10 mm slot centred on that line. Size the amplitude from the slot you want, not from the tool.
On a centerline cut the finishing pass is the two walls, not the centreline — the loops already clear right across the middle, so a sweep down it would be a pure air pass. It is the walls that are left scalloped, and it is the walls that get cleaned up.
Drill#
Two modes, and they use different tools.
Peck#
Plunges down the axis, retracting to clear chips. Points come from either:
- Clicking on the canvas to place them by hand, or
- Selecting circles — every circle in the selection is drilled at its centre.
The second is the everyday case: import a drawing, select the hole circles, drill them. Pick order is drill order.
Helical#
Cuts a hole with an end mill by spiralling down it, rather than plunging. Takes its diameter from a circular path, which means it can make a hole no drill in your library matches — and it clears chips as it goes.
Drilling measures depth from the surface it starts on, like every other operation. For a 5 mm deep hole in the floor of a 3 mm pocket, set the start to that pocket's floor and the depth to
5— the field is the depth of the hole itself. The bottom of that hole ends up 8 mm below the top of the stock, which is the number to check against your stock thickness.
Surface#
Facing passes across the whole stock, to flatten a slab or true up the top before the real work starts. Two settings — stepover and angle — and it covers the whole workpiece rather than a path you select.
Use a large flat cutter, take a light cut, and remember the result is only as flat as your machine is trammed.
Next#
- 6. V-carving and inlay — depth from geometry, and getting an inlay to seat
- 9. Nesting — packing parts onto a sheet